Introduction
High-quality product photos and videos are among the strongest conversion factors in e-commerce. Shopify and Baymard Institute research shows that buyers make decisions visually, even before reading descriptions. Poor photos create distrust, doubts, and abandoned purchases. Good photos remove barriers, increase confidence, and reduce returns.
Statistics:
- 56% of shoppers consider quality photos more important than descriptions
- Products with 5+ photos have 30% higher conversion
- 22% of returns due to unmet expectations can be prevented with better photos
Common myth: professional results require an expensive camera. Reality: a smartphone from 2020+ with a decent camera, basic knowledge, and some practice deliver results that sell. This guide is a step-by-step instruction for shooting products yourself without a studio budget.
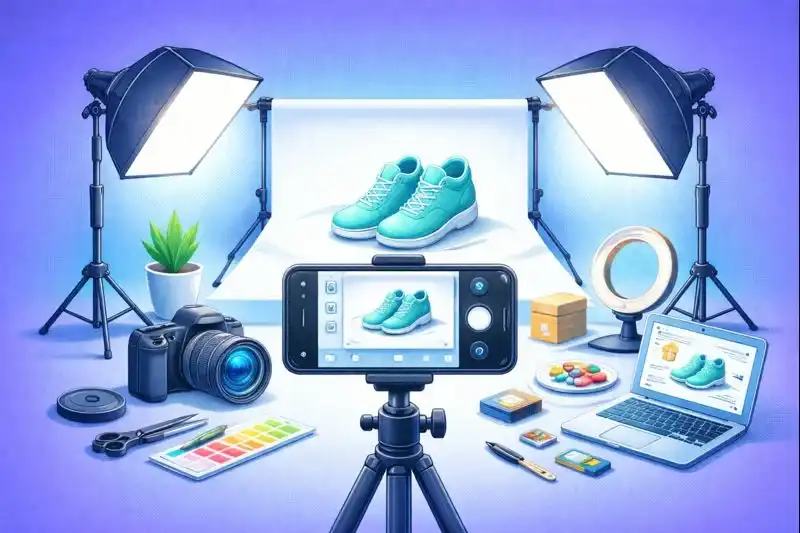
Pre-Shoot Preparation
Choosing a Smartphone and Camera Settings
Any smartphone works with:
- 12 MP or higher camera – sufficient for web and A4 print
- HDR support – helps with complex lighting scenes
- Manual controls – Pro mode or third-party apps
Recommended basic settings:
| Parameter | Value | When to use |
|---|---|---|
| Resolution | Maximum (12-48 MP) | Always |
| HDR | Enabled | Complex light scenes |
| Format | JPG or HEIC | Standard shooting |
| RAW | Enabled | Maximum editing flexibility |
| ISO | Minimum (20–100) | With tripod always |
Essential Equipment (<$50)
Minimum kit:
- Smartphone tripod ($10-15) – eliminates hand shake
- White background ($5-10) – poster board or paper roll
- Reflectors ($0-5) – white cardboard or foil
Optional Equipment
| Equipment | Price | Purpose |
|---|---|---|
| Ring light | $20-40 | Even light without shadows |
| Compact lightbox | $30-50 | Small items, jewelry |
| Clip-on macro lenses | $10-20 | Texture details |
| Gimbal stabilizer | $50-100 | Smooth video |
Lighting – The Most Important Factor
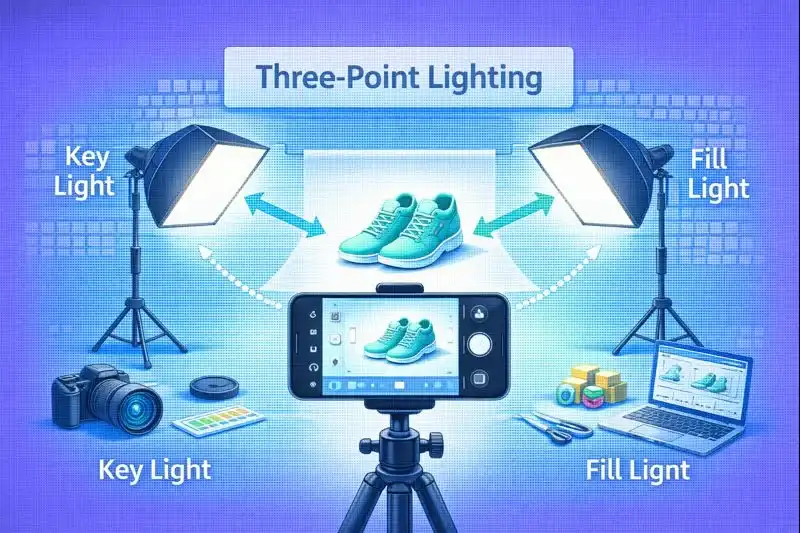
Lighting is more important than the camera. Good light makes a smartphone professional; poor light ruins even a DSLR.
Natural Light
Best light source – window.
Optimal conditions:
- Time: Golden hour (early morning, evening) or overcast day
- Direction: Light from side or 45° angle
- Intensity: Soft diffused light (not direct sun)
Artificial Light
Budget solutions:
- Two desk lamps with cool LED bulbs (5000-5500K)
- LED panels from Amazon/AliExpress ($15-25 each)
- Ring light – universal soft light
Three-Point Lighting Scheme
Professional setup:
- Key Light – 45° front, 100% intensity
- Fill Light – opposite side, 30-50%, softens shadows
- Back Light – behind product, separates from background
Common Lighting Mistakes
| Problem | Cause | Solution |
|---|---|---|
| Yellow tint | Warm light (2700-3000K) | Cool bulbs (5000K+) or WB correction |
| Overexposure | Too intense light | Reduce intensity, move lamp away |
| Hard shadows | Light from above without fill | Bottom reflector or fill light |
| Hot spots | Direct light on gloss | Diffuser or change angle |
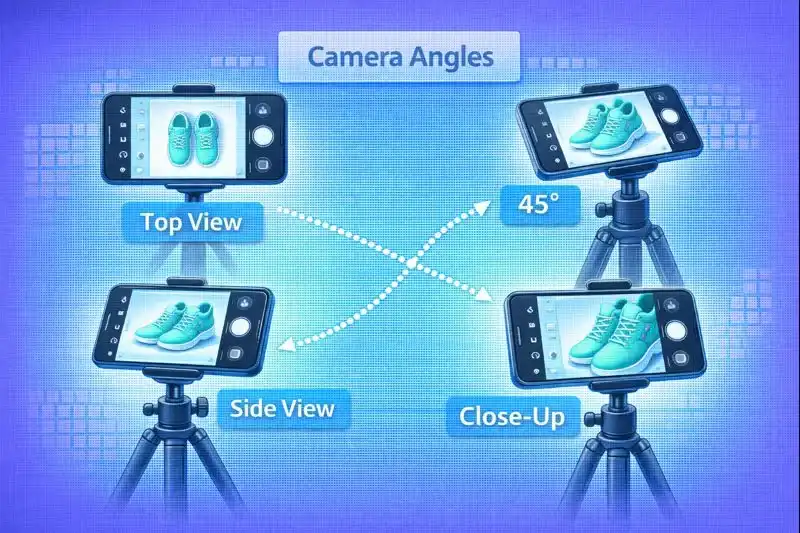
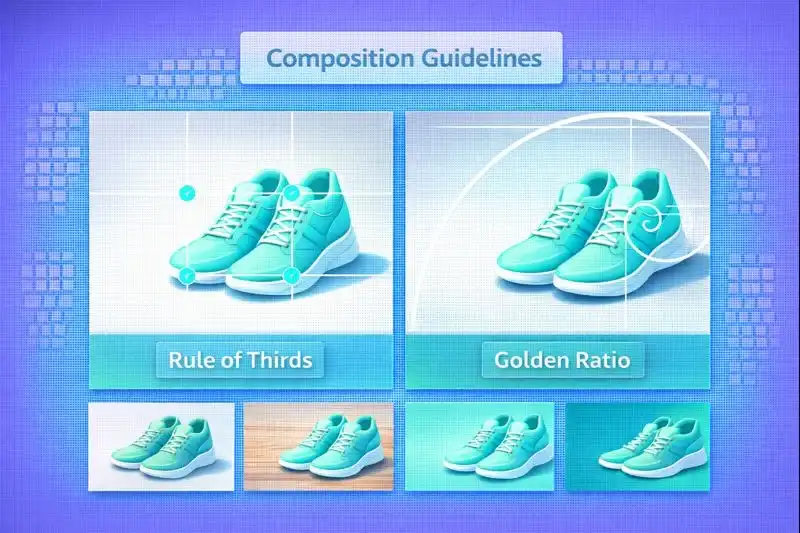
Composition and Shooting Angles

Rule of Thirds and Golden Ratio
Rule of thirds:
Place key elements at grid line intersections (not center). Creates dynamics and attracts attention.
When to break rules:
- E-commerce catalog – centering often better
- Small products – center provides balance
- Symmetrical objects – center emphasizes symmetry
Essential E-commerce Angles
Minimum 5 shooting angles:
- Front (0°) – basic product view
- 45° angle – most natural view
- Top view (flat lay) – for flat products or compositions
- Details and textures – macro for material quality
- Scale and context – product in use or with comparison object
Flat Lay Photography
Popular style for Instagram and lifestyle content.
Technique:
- Camera strictly perpendicular to surface
- Symmetry or asymmetry following rule of thirds
- Additional objects for context (no more than 3-5)
- Natural window light from top or side
Backgrounds and Context
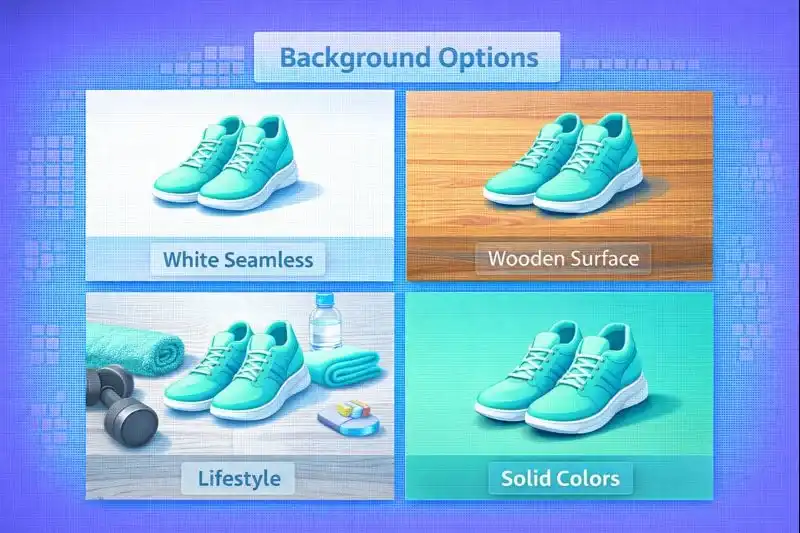
White Seamless Background
Standard for e-commerce catalogs and marketplaces.
DIY solution:
- Poster board – budget, single-use
- White paper roll – professional, cut off dirty parts
- White fabric – fleece blanket, cotton sheet (iron!)
Lifestyle Photography
Contextual photos show products in real life. Higher conversion as buyers see application.
When to use:
- Clothing and accessories (on model or mannequin)
- Decor and furniture (in interior)
- Cosmetics (on hand, face)
- Gadgets (in hands, on desk)
Textures (wood, marble, fabric)
| Texture | For what products | Mood |
|---|---|---|
| Light wood | Natural cosmetics, eco-products | Coziness, ecology |
| Marble | Cosmetics, perfumes, jewelry | Luxury, elegance |
| Concrete | Gadgets, accessories | Minimalism, modernity |
| Fabric (linen) | Clothing, textiles | Softness, homeliness |
Technical Shooting Parameters
Exposure
Problem: AUTO mode often overexposes (white background becomes gray) or underexposes.
Solution:
- Tap product for focus
- Swipe down to reduce exposure (iOS)
- In Pro mode: lower ISO and increase shutter speed
Focus
Solution:
- Tap to focus – touch product on screen, hold to lock
- Manual focus – in Pro mode adjust manually (for macro)
White Balance
Problem: AUTO often mistakes, especially with artificial light.
Solution:
- Preset modes: Daylight (5500K), cloudy (6500K), tungsten (3200K)
- Manual setting: Choose white object (paper) as reference
- Kelvin (Pro mode): 5000-5500K for neutral result
Stabilization
Solution:
- Tripod – mandatory for quality results
- Timer 3-5 seconds – press button, camera shoots after 3 sec
- Burst mode – series of 10 frames, select sharpest
- Voice command – shoot without touching smartphone
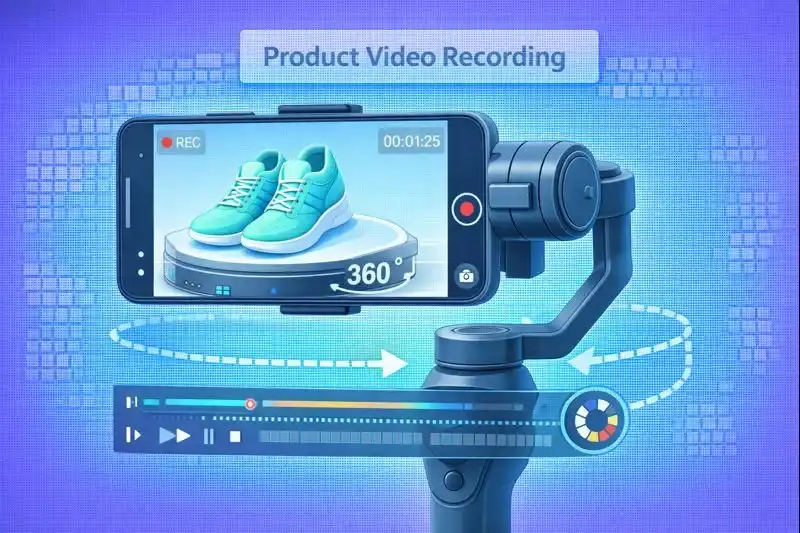
Product Video Shooting with Smartphone
Video increases conversion 80-130% compared to photos. Buyers better understand size, texture, functionality.
Video Formats for E-commerce
1. 360° product rotation
- Product on rotating table (DIY: lazy Susan)
- Static camera on tripod
- Smooth 360° rotation in 15-20 seconds
2. Unboxing
- Top view, camera on tripod
- Hands unpack product
- Show contents
- 30-60 seconds
3. Use demonstration
- Lifestyle format
- Product in action
- Close-ups on details
- 20-40 seconds
Video Settings
| Parameter | Value | When to use |
|---|---|---|
| 1080p 60fps | Full HD, smooth motion | Social media (Instagram, Facebook, TikTok) |
| 4K 30fps | High detail | Website, crop capability without quality loss |
| 1080p 30fps | Smaller file size | Email marketing, fast loading |
Video Duration
| Platform | Optimal duration | Maximum |
|---|---|---|
| Website (product card) | 15-30 sec | 60 sec |
| Instagram Feed | 20-30 sec | 60 sec |
| Instagram Reels | 7-15 sec | 90 sec |
| TikTok | 7-15 sec | 60 sec |
Post-Processing (Editing)
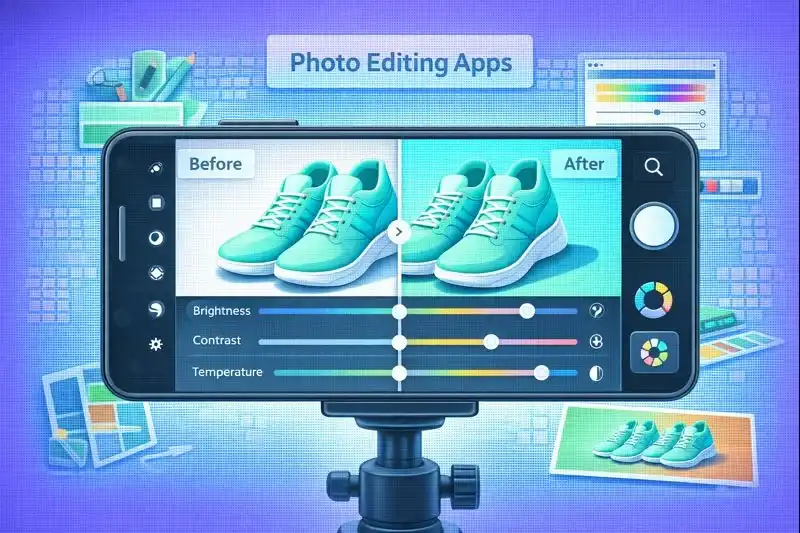
Top Free Apps
| App | Strengths | Use for |
|---|---|---|
| Snapseed (Google) | Full toolset, free | Basic corrections, selective editing |
| Lightroom Mobile (Adobe) | Professional presets, sync | Color correction, batch processing |
| VSCO | Stylish filters | Quick style, social media |
| Canva | Templates, text, graphics | Watermarks, collages |
| CapCut | Video editing | Reels, TikTok videos |
Basic Corrections (mandatory for every photo)
Processing sequence:
- Exposure – overall brightness (+5 to +15)
- Contrast – separation of light and dark (+10 to +20)
- Highlights – reduce overexposure (-10 to -30)
- Shadows – lift detail in shadows (+10 to +30)
- Whites – clean white background (+10 to +20)
- Blacks – depth (-5 to -10)
- Saturation – color intensity (+5 to +10)
- Vibrance – soft saturation (+10 to +15, better than saturation)
- Sharpness – add sharpness (+15 to +30)
- Noise Reduction – if shot with high ISO (+10 to +20)
Background Removal
Tools:
- Remove.bg – online, 1 click, free for low resolution
- Photoshop Express – mobile app with AI cutout
- Canva Pro – Background Remover ($13/mo, batch processing)
Batch Processing
Solution:
Lightroom Mobile – create preset (settings set), apply to all photos:
- Process 1 photo perfectly
- Save as preset
- Select 50 photos → apply preset → 50 photos processed in 10 seconds
What NOT to Do in Editing
| Mistake | Why bad | How it looks |
|---|---|---|
| Over-editing | Unrealistic look | Acid colors, unrealistic sharpness |
| Excessive saturation | Color doesn't match reality → returns | Poisonous reds, blues, greens |
| Too much sharpness | Artifacts, halos around objects | White halo around product |
Optimization for Different Channels
E-commerce Website
Loading speed critical for conversion. Amazon research: every second delay = -7% conversion.
Optimal parameters:
- Format: WebP (50% smaller than JPG at same quality) or JPG
- File size: <200KB for main photos, <100KB for thumbnails
- Resolution: 1500-2000px on longer side (sufficient for zoom)
- Compression: 80-85% quality (visually unnoticeable, significant savings)
Quality photos directly impact checkout conversion, details in Checkout Optimization.
Social Media
| Platform | Format | Resolution | Aspect ratio |
|---|---|---|---|
| Instagram Feed | JPG | 1080×1080 or 1080×1350 | 1:1 or 4:5 |
| Instagram Stories | JPG | 1080×1920 | 9:16 |
| Instagram Reels | MP4 | 1080×1920 | 9:16 |
| Facebook Feed | JPG | 1200×1200 | 1:1 |
| JPG | 1000×1500 | 2:3 | |
| TikTok | MP4 | 1080×1920 | 9:16 |
Photo usage in automated campaigns detailed in Marketing Automation.
Marketplaces
Requirements:
- White background (RGB 255, 255, 255)
- Minimal props
- Product occupies 80-90% of frame
- Watermarks prohibited
- Minimum 3 photos, recommended 5-8
Perfect Product Photo Checklist
Before publishing, check:
Technical quality:
- Photo sharp, in focus
- Correct exposure (not overexposed, not too dark)
- White balance correct (white background truly white)
- No noise or compression artifacts
- Sufficient resolution for zoom (minimum 1500px)
Lighting:
- Even lighting without hard shadows
- No hot spots (glare on glossy surfaces)
- Soft and natural shadows
- Light emphasizes form and texture
Composition and background:
- Clean background without distracting elements
- Product occupies 70-80% of frame
- Balanced composition
- Product in focus, background neutral
Color and processing:
- Realistic colors (match real product)
- Detail visible in highlights
- Detail visible in shadows
- Unnoticeable processing
Completeness:
- Minimum 5 shooting angles
- Details and texture clearly visible
- Product size clear
- All important characteristics shown visually
Optimization:
- File optimized (<200KB for web)
- Correct format (WebP or JPG)
- SEO-friendly filename
- Alt-text for accessibility and SEO
Common Beginner Mistakes
- Shooting handheld without stabilization – use tripod + timer
- Using built-in flash – creates harsh shadows and hot spots
- Digital zoom – sharply reduces quality, physically move closer
- Ignoring product cleanliness – dust, fingerprints visible in photos
- One shooting angle – minimum 5 angles needed
- Wrong white balance – adjust manually or fix in editor
FAQ
1. What smartphone minimally works for product photography?
Any smartphone with 12 MP+ camera released after 2020. iPhone SE 2020, Samsung Galaxy A52, Xiaomi Redmi Note 10 Pro all work.
2. Is a lightbox necessary?
For small items (jewelry, cosmetics, accessories) a lightbox simplifies setup. But you can do without: white background + two lamps/natural light give the same result for less money.
3. How many photos needed per product?
Minimum 5, recommended 7-8: front view, 45° angle, side views (2), details/texture, scale or context, packaging (optional).
4. How to photograph reflective or glass products?
Key is diffused light and controlling reflections. Use lightbox or diffusers, side light at angle, black or white cardboard behind camera.
5. How to shoot clothing without a model?
Three options: mannequin (best shows form), flat lay (clothes laid flat, top view), hanger on wall (for outerwear, dresses).
6. Can I shoot video on an old smartphone?
Yes, if you have tripod and good light. Older models have worse stabilization and low light quality, but in daylight results are acceptable. Shoot 1080p 30fps (not 4K) to avoid overheating.
7. What export settings for Instagram?
Resolution: 1080×1350px (4:5 vertical) or 1080×1080 (square), format: JPG, quality: 100%, color space: sRGB.
8. How long does editing one photo take?
Basic correction: 1-2 minutes. With background removal: 3-5 minutes. Detailed retouch: 10-15 minutes. With experience and presets, time reduces to 30 seconds per photo.
Conclusion
You don't need a professional studio, DSLR camera, or photography courses to create product photos that sell. A smartphone, basic lighting, and practice are sufficient for professional results that compete with commercial studios.
Success principles:
- Lighting more important than camera – invest time in light setup
- Tripod mandatory – stability critical for sharpness
- Minimum 5 angles – show product fully
- Realistic colors – don't over-edit, product must match expectations
- Practice more important than theory – start now, improve with each shoot
LetsCommerce platform:
LetsCommerce provides visual content tools:
- Automatic image optimization – WebP conversion, compression, adaptive sizes
- Remove.bg integration – background removal in 1 click
- Batch upload – add 50+ photos simultaneously
- Processing automation via Marketing Automation
- Photo usage in email campaigns via Email Marketing
- Effectiveness analytics – which photos generate more clicks and purchases
- CDN delivery – instant loading on any device
Quality photos increase conversion, reduce returns, increase average order value, and directly impact Customer Lifetime Value. Start improving visual content today – you'll see results next week.
Related Articles
- Checkout Optimization – how visual content impacts checkout conversion
- Marketing Automation – automation of image processing and distribution
- Email Marketing – using quality photos in email campaigns
- Customer Lifetime Value – impact of visual experience on LTV

Ready to start selling?
Launch your online store today with LetsCommerce.